Lessons Learned with Arduino

I’m excited to use to this relatively new display editor. I’ve used Nextion boards and their editor in the past but it limited me to only the Nextion displays and their editor is not as advanced.
My current setup is an Adafruit ESP32 Feather board and a Waveshare round display using the GC9A01 driver.
It did take me hours and a lot of head scratching/research to get my first display uploaded properly so I want to share some lessons learned to save others the hassle.

  1. Don’t include spaces in your project name!! I had named my project “Round Display” and kept getting odd compile errors in Arduino. I renamed my project “Round_Display” and that resolved the issue.
  2. The SLS basic tutorial video #6 shows how to export a project to Arduino but it doesn’t fully apply to the latest version of SLS. The video shows the UI folder (with the UI.ino file) containing multiple .h and .c files but when I create a template project those files don’t appear in that folder. I thought this could have been the cause of the compile errors but I now know the file structure has been changed in these later releases and the .ino file is supposed to be in a folder by itself.
  3. The default color depth is 32 bit. When I finally got a successful compile and download, the display image was a mess. Changing the depth to 16 bit yielded the proper image. You also have to change it in the lv_conf.h file, line 30.
  4. To update your display with any changes, click on “Export” and “Export UI files”. Then go back to your Arduino UI.ino sketch and upload it again. No need to close and reopen the sketch.

Hope this helps others to get over that initial learning curve with Arduino.

2 Likes

Now I’ve got a 2.8", ILI9341 TFT display connected to my ESP32 and learning how to get data from the microcontroller. After searching different methods, the only one I’ve gotten to work is shown below.
I’ve declared the “temp” variable above void setup() and have a random number generator in the loop.

You can compare the code to the SLS UI to see how to incorporate the name of the label.

Here is the physical setup:

1 Like

Touchscreen integration

It looks like this is the biggest hurdle to using SLS with a display and now I’m stuck. My display has an FT6206 touchscreen driver. SLS uses the TFT_eSPI library and this library only supports the XPT2046 touchscreen driver. To use a “non-native” touchscreen driver (like mine) I’d have to add the driver library to the SLS folder and somehow link it to the program. My programming skills are pretty basic and I’ve not found any examples on how to do this. So, long story short…
The choice of touchscreen displays that work with the libraries included with SLS is very limited :pensive:

~Bryan

1 Like

I’m taking a step backward to understand and get a touch screen working. I bought a cheap, basic touch screen that is known to work well with the TFT_eSPI library. The display driver is ILI9341 and the touch driver is XPT 2046. There is a lot of documentation on these and they cost less than $20.00.
The SLS ui.ino sketch was slightly modified to show the live X and Y touch locations while the SLS display is running on the screen so I can see the touch values corresponding to the button locations.
The next step will be to use the TFT_eSPI on-off button example as a guide for bounding the X,Y touch positions of the SLS buttons to tell when a button has been pushed. Not an elegant way to get functionality with the SLS software but I’ve found limited documentation/examples for incorporating a touch screen with SLS within the Arduino environment.

Here is my manual technique for getting the button locations. I run my basic program that shows the SLS image and spits out the X and Y locations of where I touch. I’m touching the left lower corner of the decrease button and you can see the X,Y coordinates on the serial monitor…

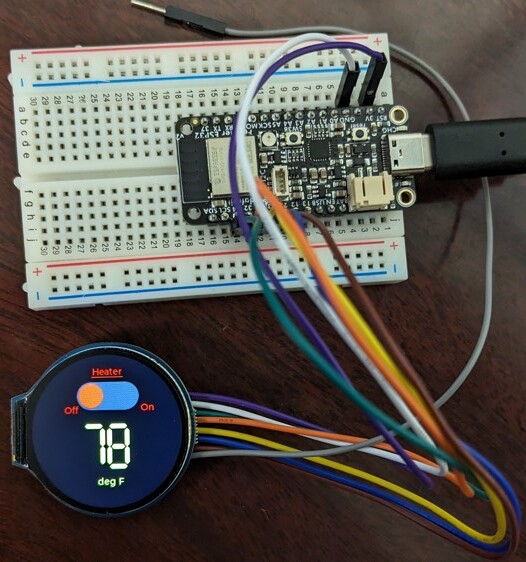
With the ui.ino modified code shown below I can interact with my screen using the SLS events (for example; clicking on a button to change screens) and I can see live data on the X and Y coordinate touch positions as shown in the last post. Again, this only works if you are using the XPT 2046 touch driver and a TFT_eSPI library recognized display driver. Also, you have to uncomment the #define TOUCH_CS line or the code won’t even compile. I’ve put in a request to SLS to make a note of this in their readme file. The touch extensions in the library can’t be accessed unless you uncomment that line. I spent a few frustrating hours trying to sort that out!

#include <lvgl.h>
#include <TFT_eSPI.h>
#include <ui.h>

/Don’t forget to set Sketchbook location in File/Preferencesto the path of your UI project (the parent foder of this INO file)/

/Change to your screen resolution/
static const uint16_t screenWidth = 320;
static const uint16_t screenHeight = 240;
uint16_t touchX = 0, touchY = 0;

static lv_disp_draw_buf_t draw_buf;
static lv_color_t buf[ screenWidth * screenHeight / 10 ];

TFT_eSPI tft = TFT_eSPI(screenWidth, screenHeight); /* TFT instance */

#if LV_USE_LOG != 0
/* Serial debugging */
void my_print(const char * buf)
{
Serial.printf(buf);
Serial.flush();
}
#endif

/* Display flushing */
void my_disp_flush( lv_disp_drv_t *disp, const lv_area_t *area, lv_color_t *color_p )
{
uint32_t w = ( area->x2 - area->x1 + 1 );
uint32_t h = ( area->y2 - area->y1 + 1 );

tft.startWrite();
tft.setAddrWindow( area->x1, area->y1, w, h );
tft.pushColors( ( uint16_t * )&color_p->full, w * h, true );
tft.endWrite();

lv_disp_flush_ready( disp );

}

/Read the touchpad/
void my_touchpad_read( lv_indev_drv_t * indev_driver, lv_indev_data_t * data )
{
//uint16_t touchX = 0, touchY = 0;

bool touched = tft.getTouch( &touchX, &touchY, 600 );

if( !touched )
{
    data->state = LV_INDEV_STATE_REL;
}
else
{
    data->state = LV_INDEV_STATE_PR;

    /*Set the coordinates*/
    data->point.x = touchX;
    data->point.y = touchY;

    Serial.print( "Data x " );
    Serial.println( touchX );

    Serial.print( "Data y " );
    Serial.println( touchY );
}

}

void setup()
{
Serial.begin( 115200 ); /* prepare for possible serial debug */

String LVGL_Arduino = "Hello Arduino! ";
LVGL_Arduino += String('V') + lv_version_major() + "." + lv_version_minor() + "." + lv_version_patch();

Serial.println( LVGL_Arduino );
Serial.println( "I am LVGL_Arduino" );

lv_init();

#if LV_USE_LOG != 0
lv_log_register_print_cb( my_print ); /* register print function for debugging */
#endif

tft.begin();          /* TFT init */
tft.setRotation( 3 ); /* Landscape orientation, flipped */

lv_disp_draw_buf_init( &draw_buf, buf, NULL, screenWidth * screenHeight / 10 );

/*Initialize the display*/
static lv_disp_drv_t disp_drv;
lv_disp_drv_init( &disp_drv );
/*Change the following line to your display resolution*/
disp_drv.hor_res = screenWidth;
disp_drv.ver_res = screenHeight;
disp_drv.flush_cb = my_disp_flush;
disp_drv.draw_buf = &draw_buf;
lv_disp_drv_register( &disp_drv );

/*Initialize the (dummy) input device driver*/
static lv_indev_drv_t indev_drv;
lv_indev_drv_init( &indev_drv );
indev_drv.type = LV_INDEV_TYPE_POINTER;
indev_drv.read_cb = my_touchpad_read;
lv_indev_drv_register( &indev_drv );


ui_init();

Serial.println( "Setup done" );

}

void loop()
{
lv_timer_handler(); /* let the GUI do its work */
delay(5);

tft.getTouch( &touchX, &touchY, 600 );

        Serial.print( "Data x " );
    Serial.println( touchX );

    Serial.print( "Data y " );
    Serial.println( touchY );

}